What is a Framework
A Framework, in simple terms, is a set of predefined classes, libraries, and tools that provide a basic structure for software development. The use of a framework allows developers to avoid implementing basic features from scratch, enabling them to focus on developing specific, customized functionalities for their projects.
Spring
Spring is an open-source framework for Java application development. The first version of the framework was released in 2003 by Rod Johnson, and it has been enhanced over the years with a series of extensions. Over time, Spring has earned a leading role in Java application development, thanks to its highly active community and the vast availability of documentation and practical examples.
In this article, we’ll see how to create a basic application for API development using Spring. The example will be built in Java, and we’ll use SQL as the database.
Web Apps with Spring
As mentioned, the base Spring framework has been enriched over time with numerous features, effectively creating a family of frameworks. By utilizing one or more of these resources, it is possible to create a web service in Java that implements REST APIs, which can be used for a website or any other application (e.g., an Android/iOS app).
Web Service
A web service is a software application capable of communicating via the HTTP protocol with any application, offering specifically implemented functionalities. An example might be a weather forecasting website: behind the graphical interface displaying the map of the area of interest, a web service processes the user’s request (such as selecting a location) and provides a weather forecast based on available data.
REST API
When talking about RESTful APIs, we’re not referring to protocols or standards, but to a series of universally accepted rules.
The main characteristics that an API must have to be considered RESTful are:
- There must be two actors, Client and Server, and resources to share.
- Communication between Client and Server must be stateless.
- Caching tools can be used to enhance the speed of interactions between Client and Server.
- An interface should be provided to standardize the transferred information.
Sample Application
Now, we’ll create a sample application based on Spring, using the Java language. Later, we’ll add the ability to save data in an SQL database and finally implement a user authentication mechanism.
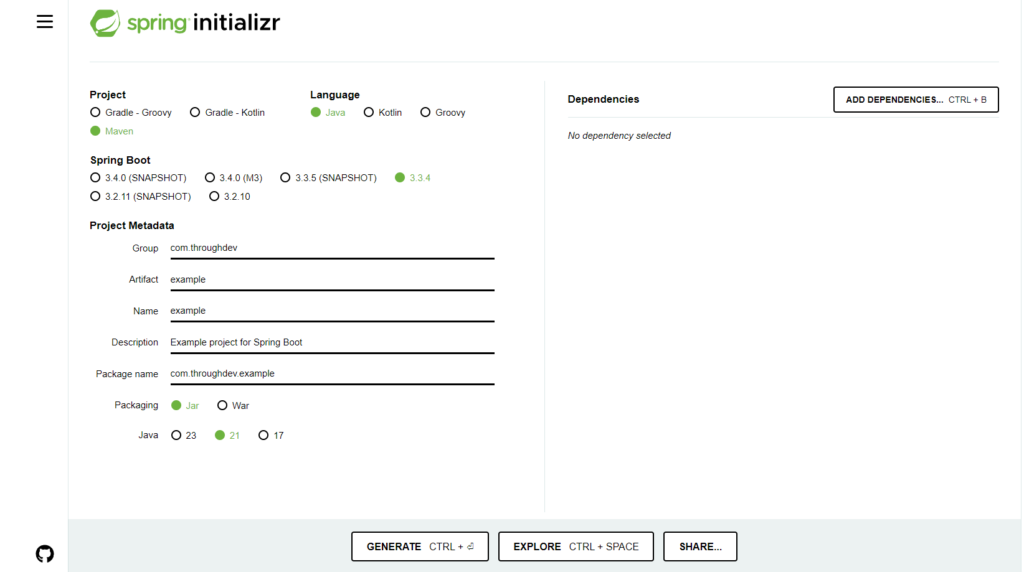
Start by visiting this link to generate a project with basic configurations for Java and Maven (or Gradle).

Although dependencies can be automatically configured, I prefer to add them manually, as we’ll see shortly. Once all options are set, click on Generate to download a zip file containing everything you need to get started.
Make sure you have everything properly installed in your development environment. By opening the downloaded project in your preferred IDE, you can start the application, which, at this point, won’t do anything yet.
Dependencies
Now let’s look at the minimum dependencies required to create our web service. The best place to search for dependencies is mvnrepository.com.
Open the pom.xml file and define the necessary dependencies. The first and probably most important one is:
<dependency>
    <groupId>org.springframework.boot</groupId>
    <artifactId>spring-boot-starter-web</artifactId>
</dependency>
This dependency should be added within the <dependencies></dependencies> tags.
If you are using IntelliJ, every time you modify the pom.xml file, you’ll need to click the appropriate icon to apply the changes:

By restarting the application, you’ll see log entries similar to these:
- Tomcat started on port 8080 (http) with context path ‘/’
- Started DemoApplication in X seconds (process running for Y)
These logs indicate that the application has started correctly and is listening on the default port 8080.
Creating the First API
Now we’re ready to create our first API. In the folder where the main class is located, create a new file called DemoController. Inside this file, add the following code:
@RestController
public class DemoController {
    @GetMapping
    public void demo() {
        System.out.println("Hello World");
    }
}
Restart the application and open the browser at http://localhost:8080. You’ll see “Hello World” printed in the console.
Adding an Endpoint to Respond to Clients
Since we’re creating APIs to be used with other applications, we want to send a response to a client. Let’s add a new endpoint:
@GetMapping(value = "/test")
public ResponseEntity<String> test() {
    return ResponseEntity.ok("Hello World");
}
Visiting http://localhost:8080/test in the browser, you’ll see the response “Hello World.”
ResponseEntity
The ResponseEntity class is Spring’s default class for representing an HTTP response. With ResponseEntity, the response includes a Status Code, Headers, and a Body.
Receiving Data with APIs
An API doesn’t always serve to provide data; it can also receive it. Let’s add an endpoint that accepts a parameter from the request:
@GetMapping(value = "/test1")
public ResponseEntity<String> test1(@RequestParam("name") String name) {
    String message = "Hello" + " " + name + "!";
    return ResponseEntity.ok(message);
}
Now, if you open http://localhost:8080/test1?name=John in the browser, you’ll see “Hello John!”.
For more complex data, it’s necessary to use the request body. Let’s add a new endpoint:
@PostMapping(value = "/test2")
public ResponseEntity<String> test2(@RequestBody String name) {
    String message = "Hello" + " " + name + "!";
    return ResponseEntity.ok(message);
}
To test this API, use the terminal:
curl --request POST --header "Content-Type: application/json" --data John http://localhost:8080/test2You’ll receive the response “Hello John!”.
Conclusion
In this first part, we’ve seen how to initialize a Spring project for creating a web service. In the second part, we will see how to interface Spring with a database so that we can persist data.
The complete code for this example is available at this link.
